OK, as promised, if a couple of days later than planned, a little tutorial for a mini book using 'hidden hinges', grab a cuppa and off we go!
Over time I have made lots of different sized mini books using hidden hinges. They are strong, discreet and allow you to adjust the depth to accommodate the level of embellishment you want to include in your mini book. They are suitable for albums made with cardstock and mount board or chipboard, those with straightforward pages and also pocket pages. The instructions I will give you are for a mini made from cardstock with plain pages or pocket pages - the construction of chipboard or mount board minis is different and I will share that another time.
All the measurements are in inches which I use for most things as I visualise better in inches plus I find it easier to be accurate. Accurate cuts and crisp scores are the secret to a good finish. A good trimmer with a score blade is useful but the combination of a trimmer and scoring board or bone folder and craft knife work equally well. I have used 12 X 12 360gsm card and 12 X 12 Lawn Fawn patterned paper for this project. A bit of cheer on a rather murky, wet day!

The finished size of this mini book is 4" X 4" X 1 1/4" with four pocket pages, but at the end of the tutorial I will share some other variations I have made. I always start by deciding the overall finished size of mini I want to make, in this case 4" X 4", working back through the size of pages, in this case 3 3/4" X 3 3/4", to the height of hinges needed, 3 1/2". To work out the length of card you will need for the hinges you must first decide the gap you want to leave between each pocket/page to accommodate decoration and embellishments, and the number of pages you need. I decided 3/8" would be the right proportion for 3 3/4" pocket pages so each hinge needs to be 3 1/2" high by 3 1/8" long giving me two pocket pages on each hinge and a flap at either end of each to attach to the front and back covers.
You will see from the finished hinges below you will score your card at 3/8" all along the 3 1/8" length making a front flap of 3/8", a gap between the flap and first hinge of 3/8", the first hinge, a peak of 2 X 3/8" strips taped together on the reverse, a gap of 3/8" followed by the second hinge of 2 X 3/8" strips taped together as before, and a 3/8" gap and 3/8" flap, making up the 3 1/8" total length.
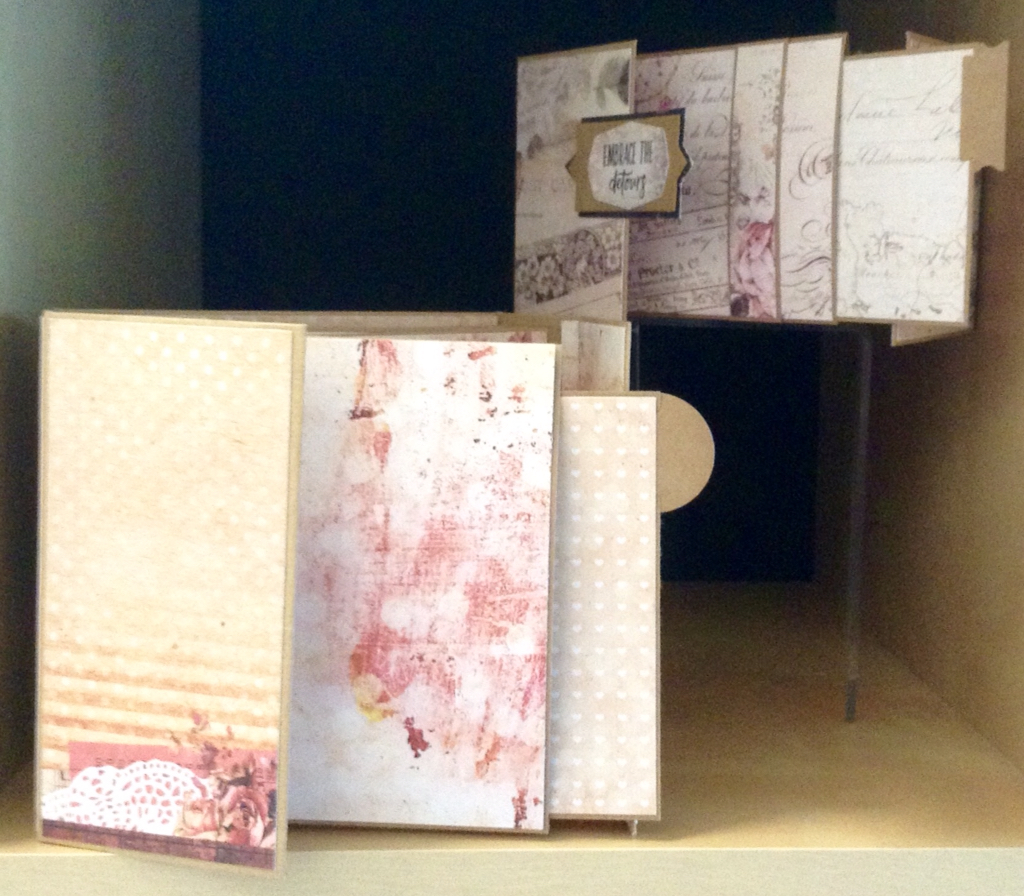
I forgot to take a photo of how the hinge strip folds and where you tape it but the photo below shows it for a three page hinge so you can get the idea. (The finished hinge on the left is the front view and the hinge on the right shows the reverse with the tape in place.)
The photo above shows the covers laid out and you need a piece of card strong card (can be cut from cereal packets or a shoe box, no one will ever know as it will never be seen!) 4"X 4" for the back cover, two pieces 4"x 2" for the front covers and two pieces 4" X 1 1/4" for the sides.
When you lay everything out check the hinges are the same depth as the side pieces - the score lines between the flaps and end gaps line up with the 1/8" space you leave between the cover pieces. If you feel your card is not thick enough then simply double up the pieces and tape them securely together. On the subject of tape I always use the high tack red backed tape for any part of the mini subject to movement/stress so the hinges and pages, with normal double sided tape for the rest.
You need to select your paper for the outside cover and cut it to 12" X 5 1/2" and score it (for crisp folding) at 1" on each side. Lay your cover piece right side to the table and arrange the cover pieces as shown with an 1/8" gap to accommodate the folds. I always start from the 1" scoreline at each end and work in, saves time and measuring!

Tape each of the cover pieces in place and add a strip of tape over each 1/8" gap, this strengthens the folds and if you run your bone folder down the gap before you remove the tape backing it makes for really crisp folds. Tape the two short sides at the edges of the front cover and add one continuous length of tape to the long sides of your paper - at this point you can mitre the corners if you wish to reduce bulk, and fold in the two short edges then the long edges. Cut paper to 10 3/8" X 3 7/8" to line the inside covers then, using red back tape, stick the hinges in place lining up the score line between the flap and gap at each end with the 1/8" gap between the front and back covers and the sides. Add red back tape to both sides of each page hinge if you are making pocket pages but to either the front or back of each page hinge if you only want normal pages. Cut your four pocket pages at 7" X 3 3/4" scored at 3 3/4" and cut a notch halfway along the top edge with a circle punch or similar. Tape the base of the page from the score line towards the back edge of the pocket page as below, leaving a gap where the pocket will slip over the pocket hinge. If you are using normal pages simply cut four at 3 3/4" X 3 3/4" and skip the rest of this step.

Take the backing off the tape on the back of your first pocket hinge and stick the back of your pocket page in place, centred on the pocket hinge as shown. Remove the backing from the tape on the front of the pocket hinge and the base of the pocket and fold the front into place so it lines up with the back. Repeat for each of the other pocket pages. If you are using normal pages simply add each page to the page hinges either on the front or the back, it doesn't matter which, it just has to be the same for each page to keep the spacing right.
Cut four inserts for your pocket pages at 3 1/4" X 3 1/4" from cardstock and eight patterned paper pieces at 3 1/8" X 3 1/8" to line them. I made some tabs with reinforcers to decorate them as shown below. If you are using normal pages then the patterned paper to line them will be 3 3/8" X 3 3/8" and you will need eight pieces.
Have fun decorating the pages and inserts, I also added patterned paper to the gaps between each page as I didn't like the plain card showing, and used the new Mini Motivations stamp set by Tim Holtz for Stampers Anonymous for the inside as this was intended to be a 21st birthday card for our younger daughter. I used a magnet to fasten the front of the mini but ended up adding ribbon too as the magnet proved to be too weak to keep the book closed - a design feature from a disaster!
You can see my mini closed below alongside a planner I made a few months back. The overall finished size of that was 6 1/4" X 8 1/2" X 2 1/4".
This also had pocket pages but this time opening on the inner edge rather than the top. The finished size for these was 5 7/8" X 7 3/4" and as I was using 12 X 12 papers I cut two pieces of 5 7/8" X 8" and scored a 1/4" flap on the top of one and the bottom of the other to fasten the two halves of the pocket together.
The hinges for this (not so) mini were 7 1/2" high by 6" scored at every 1/2" along the 6" length to hold three pages each side as I felt I needed a bit more depth between the pages of this one.
The pocket inserts for this one were 5 1/4" X 7 1/4" and the papers I used for this are from Kaisercraft and Lawn Fawn, with stamps from Hero Arts and dies from both Impression Obsession and Hero Arts and the cutest brightly coloured paper clips from Sainsbury.
For the cover of the planner I had to join two sheets of 12 X 12 paper together which is something to think about when deciding on the size of mini you want to make. For the following three minis I used brown paper to wrap the cover pieces, it works really well as it is cheap, strong and went well with the Kraft card pages I used.
This first one, which you have all probably seen in the Studio or at an event, is a favourite and was a workshop sample last Autumn made from the fabulous Rossibelle collection from Prima. The finished size was 6" X 6" X 2" with the hinges 5 1/2" X 6" scored at 1/2" intervals to hold three pocket pages, and the pocket pages a finished size of 5 3/4" X 5 3/4" with 5" X 5" inserts.
These final two gatefold minis are unfinished, both (partially) decorated with Frank Garcia collections for Prima. The square version is the same size as the mini above with Love Clippings, and the second 6"X 4" version with Wild & Free. The hinge size for this one was 3 1/2" X 6" again scored at 1/2" giving three pocket pages with those at 3 3/4" X 5 3/4" finished size and inserts at 3" X 5" . I have varied the tabs on all the inserts but the key thing is to remember to allow enough space between the open edge of the pocket pages and the sides of the mini to accommodate them.
As you will have gathered none of this is rocket science, you just need to think through how you want your finished mini to look and adjust your measurement to suit. Any questions just email me, hope you enjoy making a hidden hinge mini of your own, I'd love to see what you come up with.
Meantime, I have earned an afternoon playing working with my new Distress Oxide ink pads, back with the March Studio schedule later this week with more brand new workshops.
Val x


No comments:
Post a Comment